Incident Management
Edit Schedules
Add users, create overrides, or modify handoff times.
As individuals join and leave your on-call rotations, you must edit your schedules so that the correct people are on call and notified at the correct times.
**Create a Schedule**
**User Permissions**
You can add all individuals, except Limited and Full Stakeholders, to schedules.
People with the following roles can add or remove teams while editing:
- Global Admin
- Account Owner
People with the following roles can make other edits to on-call schedules:
- Users
- Admins/Global Admins
- Manager base roles and team roles
- People with a Manager Team role can manage only their team’s schedules.
- Account Owner
Add or Remove Members from an Existing Schedule
- Navigate to People Schedules and select the schedule to update.
- On the rotation to modify, click **** and select Edit.
- In the Edit Rotation modal, configure the following:
| Action/Field | Description |
|---|---|
| Members Tab | Click this tab to manage rotation members. |
| Add members | Search for and select the members to add. Repeat this step until you add all required members. |
| Sequence | Drag and drop names to adjust the sequence if needed. Members move through the rotation in top-to-bottom order. |
| Remove Member | Click the **** icon next to a member to remove them from the rotation. |
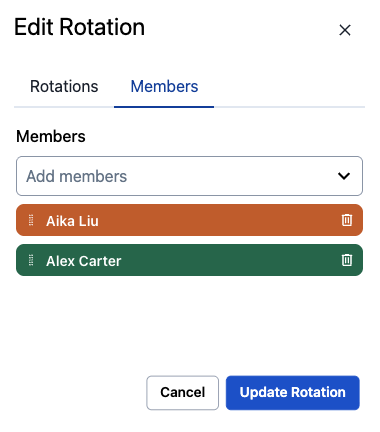 Edit Rotation
- Click Update Rotation.
- Click Save Schedule.
Deciding Between an Override and a Custom Shift
To determine the best option, ask yourself:
"Do you want to replace or add a responder?"
If Replace: Use an Override. If Add: Use a Custom Shift.
Use a Custom Shift When
- Filling Empty Gaps: You need coverage during a time when no rotations are active, such as a one-off emergency block during a holiday or extending coverage past a rotation's end date.
- Adding Extra Support: You want an additional person on call without removing the person already scheduled. A common example is adding a second responder to assist during a high-risk deployment.
- Handling Irregular Windows: You need to cover a specific maintenance window that does not align with regular rotation boundaries or has nothing to do with the standard rotation.
- Expressing "Additive" Intent: The goal is to add a person to the on-call set rather than replacing whoever is currently scheduled.
Use an Override When
- Swapping Responders: You need to replace a specific member of a rotation who is unavailable (for example, Alice is sick, so Bob covers her specific shift).
- Performing a Scoped Replacement: You want to target a specific rotation or custom shift and change who is assigned to it for a set window of time.
**Sanity Check**
- If removing the override leaves the schedule with the correct on-call person, keep it as an override.
- If removing the override leaves a gap, you require a custom shift.
Create an Override in the Web App
Overrides allow you to make one-time manual adjustments to on-call schedules. Use them when someone is unavailable due to illness, vacation, or when team members need to swap on-call shifts.
- Navigate to People Schedules and select the schedule to create the override.
- Select a member within a rotation to override. You can create an override on any span of time on a schedule.
**Override Option Not Visible**
- Click + Override.
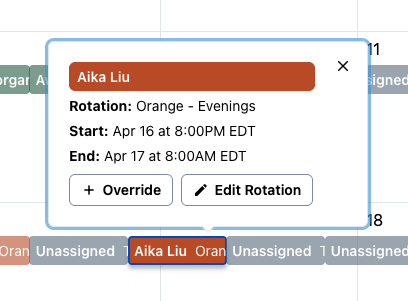 Create an Override
- In the Create an Override modal, select a member to cover the shift and click Create Override.
- Click Save Schedule.
You can also create overrides in My On-Call Shifts or via the API.
Delete an Override in the Web App
- Navigate to People Schedules and select the schedule with the override to delete.
- Click the override within a rotation. Overrides are clearly marked (Override).
- Click Remove.
- Click Save Schedule.
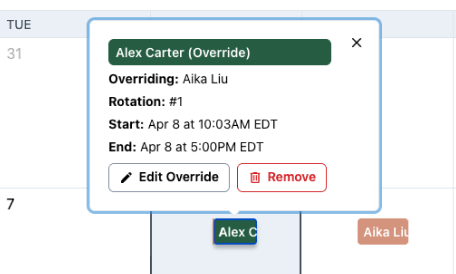 Remove an Override
Create an Open Schedule with Responder Sign-Ups
Open schedules allow responders to select their shifts.
- Navigate to People Schedules and click + Create Shift-Based Schedule.
- Configure your schedule details, then click + Create Rotation. Create a rotation with configured days and times, but do not assign members to the rotation.
- Create as many rotations as needed without assigning members.
- Click Save Schedule.
Responders can now add themselves to the schedule and choose their rotation.
Create a Custom Shift
Creating a one-off shift on top of an existing rotation allows you to handle temporary gaps or surge requirements without affecting the logic of your long-term recurring rotations.
- Navigate to People Schedules and select the schedule to create a shift.
- Under the Create Rotation dropdown, click Create Shift.
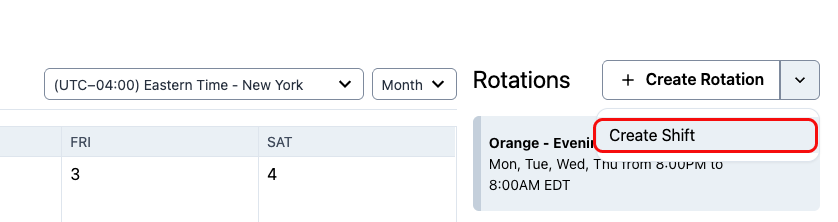 Create Shift Button
- In the Create Shift modal, enter the shift details. You can add a team member or leave the shift unassigned to keep it open for a team member to claim. Click Create Shift.
Duplicate a Schedule
Copying an existing schedule to make a new one with the same members and settings is an easy way to create new schedules at scale.
There are two places to duplicate a schedule in the web app:
Duplicate a Rotation
Copying a rotation is an easy way to ensure your settings transfer to another rotation when creating a schedule.
- Navigate to People Schedules and click the name of the desired schedule.
- On the rotation to duplicate, click **** and select Duplicate.
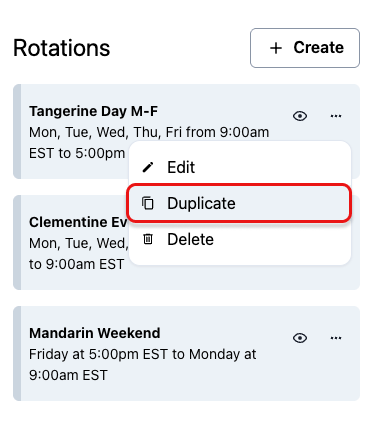 Duplicate Rotation
Hide or Unhide a Rotation
To remove a rotation without deleting it from a schedule, you can hide the rotation.
- Navigate to People Schedules and select the desired schedule.
- On the rotation to hide, click the **** icon.
- Click the greyed-out icon again to unhide the rotation.
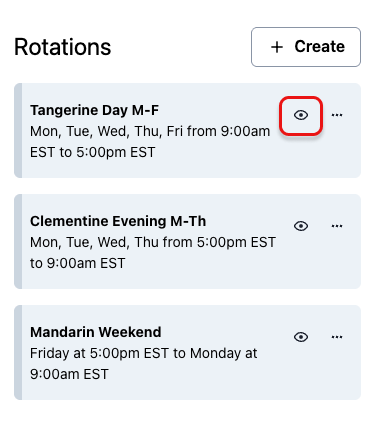 Hide Rotation
Pause or Deactivate an On-Call Schedule
Change the Escalation Policy for the Service
Visit the Escalation Policies and Schedules article for instructions on how to change a service’s escalation policy. This ensures that incidents triggered for the service do not alert the schedule to deactivate.
Remove a Schedule from a Team
Before you can remove a schedule from a team, note the following:
- If you manually added a schedule to a team via the instructions in teams, a person with a base role of Admin or higher can remove the schedule from the team.
- If you manually added an escalation policy with a schedule to a team via the instructions in escalation-policies, you must first remove the escalation policy from the team via the instructions in escalation-policies before removing the schedule.
To remove a schedule from a team:
- Navigate to People Schedules and select the desired schedule.
- Click the **** icon beside the schedule name.
- Under Teams, click the X to remove a team.
- Click Save Schedule.
End a Rotation
Schedule a rotation to end immediately or on a specific date for temporary coverage, such as holidays or short-term projects.
- Navigate to People Schedules and select the desired schedule.
- On the rotation card, select the **** menu and click End rotation.
- In the End Rotation modal, select an End method (either End Immediately or A specific end time) and click End Rotation.
- Click Save Schedule to apply the changes.