AI & Automation
Incident Workflows
Create packaged incident response actions
Incident Workflows allow you to build an automated response for every incident. For example, you can configure one workflow that automatically triggers for all P1 and P2 incidents, and a separate workflow that orchestrates a security incident response. Through highly-configurable triggers and actions, you can apply "if-this-then-that" logic to orchestrate the right response for your teams, processes, and business. Streamline your response orchestration processes even more by taking advantage of Workflow Integrations.
Browse Workflow Actions
Explore the full Workflow Actions catalog — every available action across 31 integrations (AWS, Slack, Jira, Datadog, and more), with per-plan availability.
Availability
Incident Workflows are included with the following pricing plans: Business, Digital Operations (legacy), and Enterprise for Incident Management.
Accounts on the Professional pricing plan have access to Incident Workflows and can create one Incident Workflow. This includes the following triggers and actions:
- Incident Type trigger
- Create Incident Dedicated Channel
- Archive Incident Dedicated Channel
- Send a Message to a Channel
- Link Incident Notification Channel
- Post to External Status Page
- Wait for Status to Change
- Jeli: Create a Post-Incident Review
- Jira Cloud: Create an Issue for an Incident
- Create a Zoom Meeting
Contact our Sales team to upgrade to a pricing plan with full Incident Workflows access.
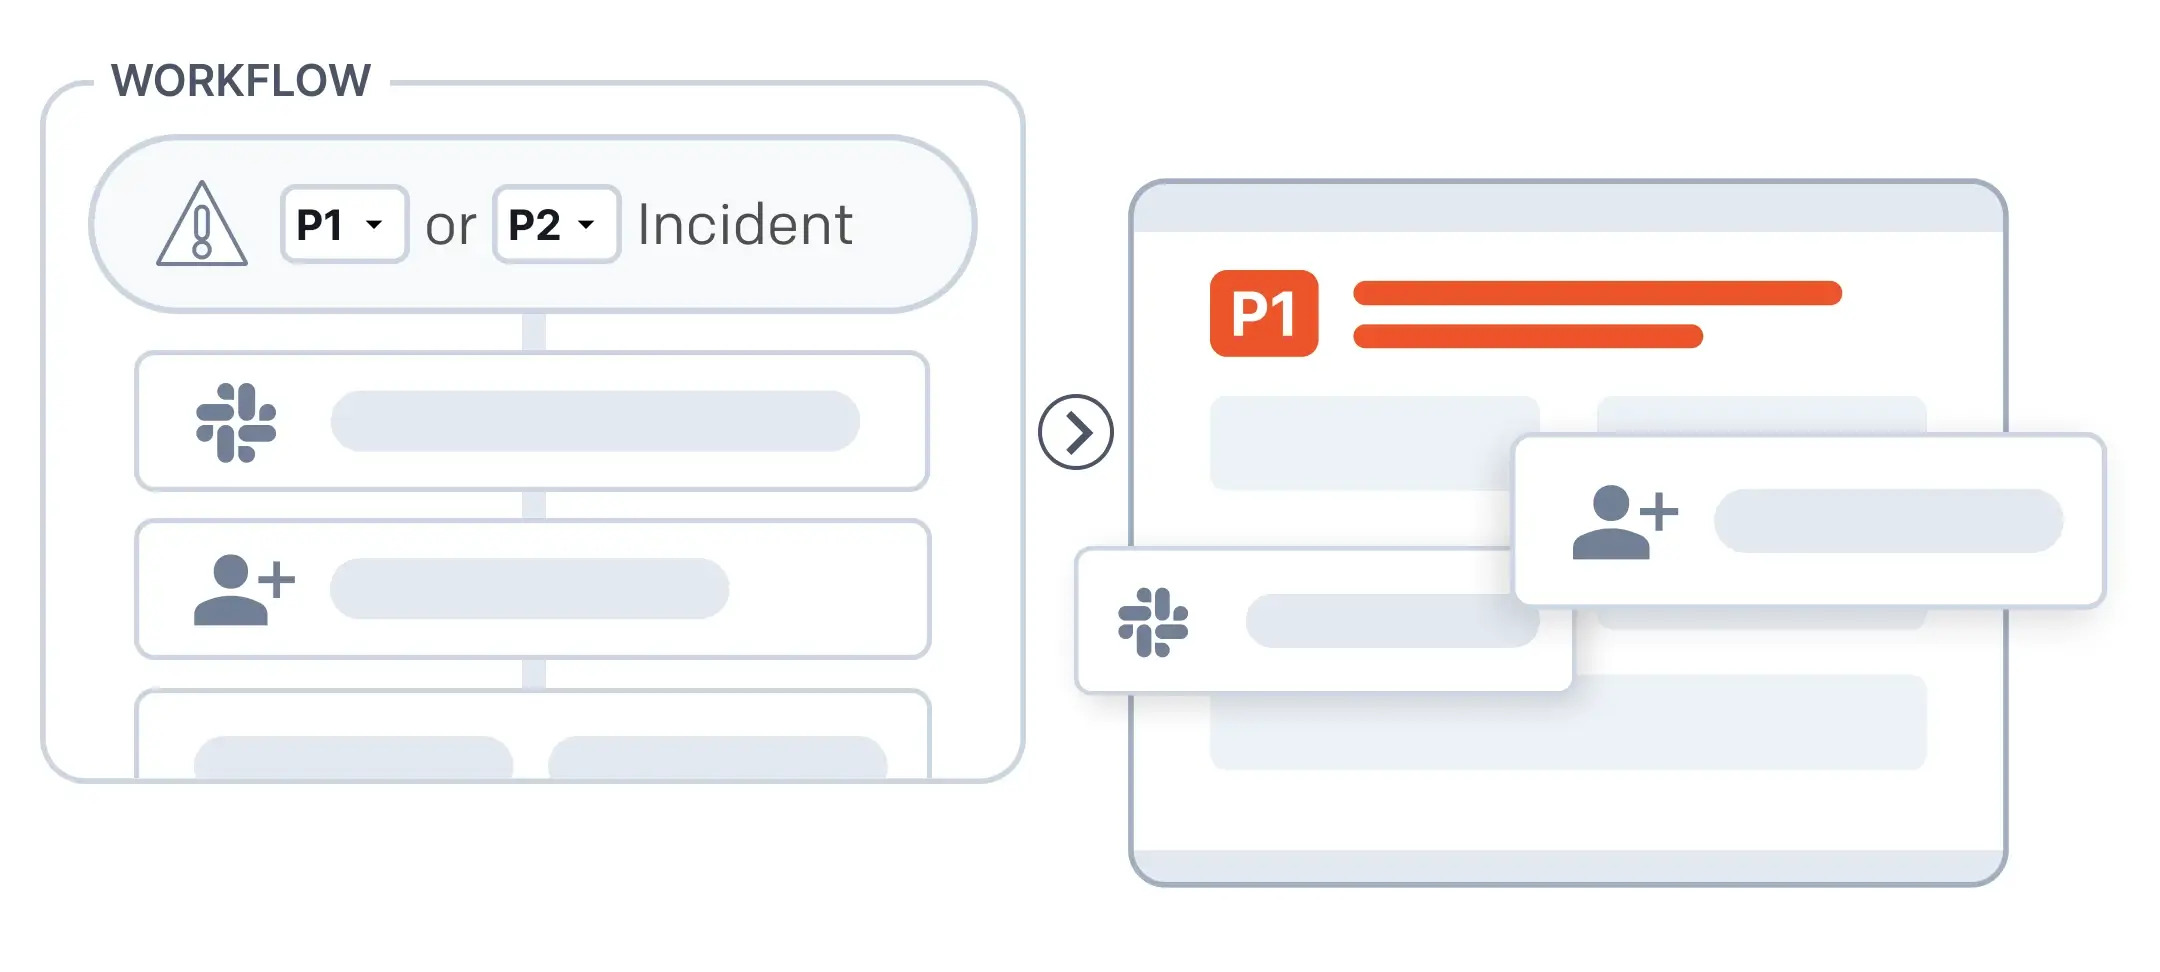
Incident Workflow Components
Incident Workflows are comprised of three main components: triggers, actions, and Workflow Integrations. By customizing the right set of triggers and actions, you can adjust workflows for your particular use case.
Triggers
Triggers determine when Incident Workflows run. You can add multiple triggers to each workflow to customize your preferred response — for example, to create a workflow that only runs for high-priority incidents. There are four types of triggers: Incident Type, Conditional, Manual, and API.
Incident Type Triggers
Incident Type triggers automatically start an Incident Workflow whenever you create or set an incident of the specified type. You can select one or more Incident Types to trigger the workflow. This trigger automatically applies to all services on your account.
Required User Permissions
Availability
Conditional Triggers
Conditional triggers can start Incident Workflows whenever an incident is created, or only when specific conditions are met.
- If you select When an incident is created, you are not required to add a condition. If you do add a condition, it will be evaluated when the incident is created.
- If you select When conditions are met, the condition is evaluated any time there is a change to the incident. This means that a workflow could potentially run multiple times. For example, if the condition is
priority matches P-1and a user toggles the priority back and forth betweenP-1andP-2, the workflow will trigger each time the incident's priority changes toP-1.
Availability
Workflow Trigger Behavior
If you select When conditions are met, the condition is evaluated every time there is a change to the incident. The workflow will trigger if:
- The condition evaluates to
truewhen the incident is initially created. - The condition changes from
falsetotrueupon an update to the incident.
Once triggered, the workflow will not activate again on subsequent changes if the condition remains true. However, if the condition changes to false and then back to true, the workflow will trigger again. This allows the workflow to potentially run multiple times during the lifecycle of an incident, but only when the condition transitions from false to true.
Scenario Example
Consider a workflow with a conditional trigger set to activate when the priority is P1 or P2:
- Incident Creation: The incident's priority is set to P1. The condition evaluates to
true, triggering the workflow. - Priority Change to P2: The condition remains
true, so the workflow is not triggered again. - Priority Change to P3: The condition evaluates to
false, and the workflow is not triggered. - Priority Change Back to P1: The condition changes from
falsetotrue, triggering the workflow once more.
When a conditional trigger is used, it performs actions automatically. Some actions, such as adding responders, require a user association for the request. When this occurs, the incident's assignee (or first assignee if there are multiple users assigned) is logged as the user performing the action in the incident timeline.
The following conditional trigger fields are available on the Business pricing plan:
- Priority
- Status
- Urgency
- Single Select Custom Fields
- Incident Type API Name
In addition to the fields above, accounts on the Enterprise plan for Incident Management have access to the following fields:
- Custom Fields
- Created At
- Incident Key
- Incident Number
- Resolved At
- Service ID
- Title
- Updated At
| Professional | Business | Enterprise | |
|---|---|---|---|
| Triggers | Trigger workflows based on Incident Type. Included triggers: Incident Type Trigger | Trigger workflows off a limited set of fields. Included triggers: Manual triggers, Incident Type trigger, conditionally trigger off of priority, status, and urgency, trigger off Single Select Custom Fields | Trigger workflows off all incident fields. Included triggers: Manual triggers, Incident Type trigger, conditionally trigger off of all fields, including Custom Fields |
| Example | Trigger when incident type = "major incident" | Trigger when priority = P1 | Trigger when impacted_region == us-west-1 |
| Maximum workflows | One enabled workflow | Up to 2,000 workflows; up to 100 conditional triggers applied to the same service; up to 50 workflows with conditional triggers that apply to all services | Up to 2,000 workflows; up to 100 conditional triggers applied to the same service; up to 50 workflows with conditional triggers that apply to all services |
Contact our Sales team to upgrade your account to trigger workflows off additional fields.
Conditional Trigger Limits
You are limited to 100 enabled Incident Workflows with conditional triggers that apply to the same technical service, and 50 enabled Incident Workflows with conditional triggers that apply to all services on your account.
Read the Disable an Incident Workflow section below for more information about enabling and disabling workflows.
Manual Triggers
Manual triggers let responders start the Incident Workflow directly from an incident. When a manual trigger is added, Incident Workflows can be triggered from the PagerDuty web app, mobile app, Slack, or Microsoft Teams.
Availability
Required User Permissions
API Triggers
You can trigger workflows using the Incident Workflows REST API endpoint. One of the following user roles is required to trigger workflows via the API:
- Manager base role
- Admin
- Account Owner
Integration Triggers
You can trigger Incident Workflows directly from the Slack, Microsoft Teams, ServiceNow, Zendesk, Salesforce, and Jira Server integrations.
Applying Triggers to Services
The last step of creating a trigger is applying it to the right services. There are two ways to apply a trigger to services:
- Apply a trigger to all services on the account.
- Apply a trigger to specific services.
Once a trigger has been applied to a service and the workflow has been published and enabled, it can be used for incidents on those services.
Actions
Every Incident Workflow is made up of a set of actions that define what the workflow will do. You can review a list of supported actions in the Workflow Actions library.
Workflow Integrations
Workflow Integrations facilitate the connection between Incident Workflows and external tools such as AWS, Azure Functions, Datadog, and Web API, enabling seamless authentication and data exchange. Read Workflow Integrations to learn more.
Create an Incident Workflow
Required User Permissions
Maximum Workflow Amount
Create an Incident Workflow from a Template
Incident Workflow templates provide a helpful starting point so you do not have to create a workflow from scratch. With templates, you can see best practices and review common examples of Incident Workflow use cases.
-
In the web app's top navigation bar, navigate to Automation Incident Workflows.
-
Select the template you would like to use:
- Major Incident
- Collaboration
- Update Stakeholders
You will be directed to a preview of the template.
 Incident Workflow Templates
- Click Use Template to create a workflow based on the template you selected.
- Optionally, select the Settings tab to modify the workflow Name, Description, and Who can edit this Workflow?. Click Save.
- With the Builder tab selected, triggers and actions that require updates are marked Needs attention.

- Click a trigger or action to review its configuration:
- For any triggers or actions you wish to remove, click Remove.
- Click to add additional triggers or actions.
- To the left of a trigger or action, click and drag to reorder items.
- When you are satisfied with the workflow's configuration, click Publish in the upper right, then click Publish again in the confirmation modal.
Create an Incident Workflow from Scratch
- Navigate to Automation Incident Workflows from the top navigation bar.
- Click Create Workflow.
- Enter a workflow Name and Description. Under Who can edit this Workflow?, select one of the following:
- All admins
- Team managers on a specific team: Select the preferred Team from the dropdown.
- Click Create.
Add Triggers
- Click Add Trigger and select from the following:
Add Actions
- Click Add Action and select an action. Reference the full list of Incident Workflow actions. Actions trigger in the sequential order in which they are added to the workflow.
- Repeat steps 5–6 until all appropriate triggers and actions have been added.
- Click Publish in the upper right, then click Publish again in the modal to confirm. The Incident Workflow is now published and enabled.
Incident Workflow Drafts
Until an Incident Workflow is published, it exists as a draft. Draft Incident Workflows will not run, even when they have fully configured triggers. If you leave the workflow builder before an Incident Workflow has been published, it will remain in a draft state.
When you edit a published workflow, it creates a draft version where changes can be safely made without affecting the published version. You can only have one draft at a time. When you publish a draft, it replaces the previous live version.
Edit an Incident Workflow
Required User Permissions
- Navigate to Automation Incident Workflows.
- Click to the right of the Incident Workflow you would like to edit and select Open in Builder.
- If the Incident Workflow has already been published, your edits will be applied to a draft. This allows you to make changes without impacting the workflow currently in use. When you are ready to apply those changes, re-publish the workflow.
- Make your edits to Triggers, Actions, and/or Settings, then click Save.
Edit Workflow Permissions
Workflow permissions are set per-workflow, and you can grant access by role or Team. A Team must be given explicit permission to view or edit a workflow, and only one Team can have access at a time.
Users with edit access can also run the workflow via the API. When using the Team managers on a specific team setting, users on that Team with an Observer or Responder role can also run the workflow via API, though they cannot edit it. Additionally, when an incident triggers a workflow, any user added to that incident as a responder can also run the workflow via API.
Required User Permissions
- Navigate to Automation Workflows.
- Select to the right of the workflow you wish to edit, then select Open in Builder.
- Select the Settings tab. Under Who can edit this Workflow?, select one of the following:
- All admins
- Team managers on a specific team: Select your preferred Team from the dropdown.
- Click Save.
Edit Manual Workflow Permissions
To run a workflow manually, it must have a manual trigger, from which you can configure permissions. Manual workflow permissions are set per-trigger.
Required User Permissions
- Navigate to Automation Incident Workflows.
- Select to the right of the workflow you wish to edit, then select Open in Builder.
- Select the Manual Trigger. Under Who can run this workflow?, select one of the following:
- All incident responders
- Incident responders on a specific team: Select your preferred Team from the dropdown.
- Click Save.
Disable an Incident Workflow
If you would like to make a published workflow temporarily unavailable, you can disable it. Disabled workflows cannot run via the API or conditional triggers, and will not appear on incidents in the list of manually-triggered workflows.
- Navigate to Automation Incident Workflows.
- To the right of the workflow you wish to disable, click and select Disable Workflow.
- In the confirmation modal, click Disable.
Re-Enable a Workflow
Delete an Incident Workflow
Irreversible Action
- Navigate to Automation Incident Workflows.
- To the right of the workflow you wish to delete, click and select Delete Workflow.
- In the confirmation modal, click Delete.
Field References
You can use field references to dynamically insert incident data into your Incident Workflow actions. During configuration, you may add data such as incident.id, incident.status, or incident.priority to an action's input parameters, resulting in the workflow pulling the corresponding incident's data each time it runs. This allows you to customize and standardize the information, settings, and flow of every response. Browse all available field references by typing {{ in the input field or by clicking the icon on the right side of the input field.
 Insert Field Reference Icon
Examples
- Add Users as Responders: Include
{{incident.service.name}}and{{incident.priority}}in the Message field so responders see the service name and priority in the responder request. - Send Status Update: Include
{{incident.title}}and{{incident.priority}}in the Message field so stakeholders see the incident's title and priority in their status updates. - Create a Slack Channel for an Incident: Include
{{incident.id}}in the Desired Channel Name field to generate a unique channel name every time.
Supported Fields
Incident Workflows support referencing fields in most action configuration fields. Field references use the syntax {{example}} — also referred to as "double curly braces" or "double handlebars."
| Field Name | {{field-name}} |
|---|---|
incident.custom_fields.CUSTOM_FIELD_NAME (varies based on the Custom Field's name) | {{incident.custom_fields.CUSTOM_FIELD_NAME}} |
incident.id | {{incident.id}} |
incident.url | {{incident.url}} |
incident.title | {{incident.title}} |
incident.status | {{incident.status}} |
incident.service.id | {{incident.service.id}} |
incident.service.name | {{incident.service.name}} |
incident.urgency | {{incident.urgency}} |
incident.priority | {{incident.priority}} |
incident.created_at | {{incident.created_at}} |
incident.updated_at | {{incident.updated_at}} |
incident.resolved_at | {{incident.resolved_at}} |
incident.incident_key | {{incident.incident_key}} |
incident.incident_number | {{incident.incident_number}} |
incident.conference_bridge.conference_url | {{incident.conference_bridge.conference_url}} |
incident.conference_bridge.conference_number | {{incident.conference_bridge.conference_number}} |
current_date | {{current_date}} |
time_zone | {{time_zone}} |
workflow.id | {{workflow.id}} |
workflow.name | {{workflow.name}} |
Action-Specific Field References
Most actions produce outputs that you can use as field references in later steps of the workflow. While configuring an action, find compatible outputs under the Steps tab. Select your desired action and output. It will be formatted as {{steps['ACTION_NAME'].fields['FIELD_NAME']}}.
See the full Workflow Actions library to review each action's available outputs.
Default Action Names
PagerDuty generates a default name for each action — for example, Create Slack Channel for an Incident — which you can reference in later steps using {{steps['Create a Slack Channel for an Incident'].fields['Channel Link']}}.
You can rename an action by clicking Rename to the right of the action's title. If you rename an action, update the string name in the steps object as well. For example, if you rename the action to Auto-generate Slack Channel, reference its channel link with {{steps['Auto-generate Slack Channel'].fields['Channel Link']}}.
Differentiating Outputs
There are two options to consider when naming actions:
- If you add action steps with the same name, they appear as one set of field references in the Field Reference picker. A subsequent step with the same name will overwrite the prior step's outputs.
- If you want to uniquely reference the output from a specific step, rename the actions so that each has a distinct name.
Example — Actions with the Same Name:
A workflow includes two actions, both named Send GET Request, followed by a Condition that sends a message if the condition is met.
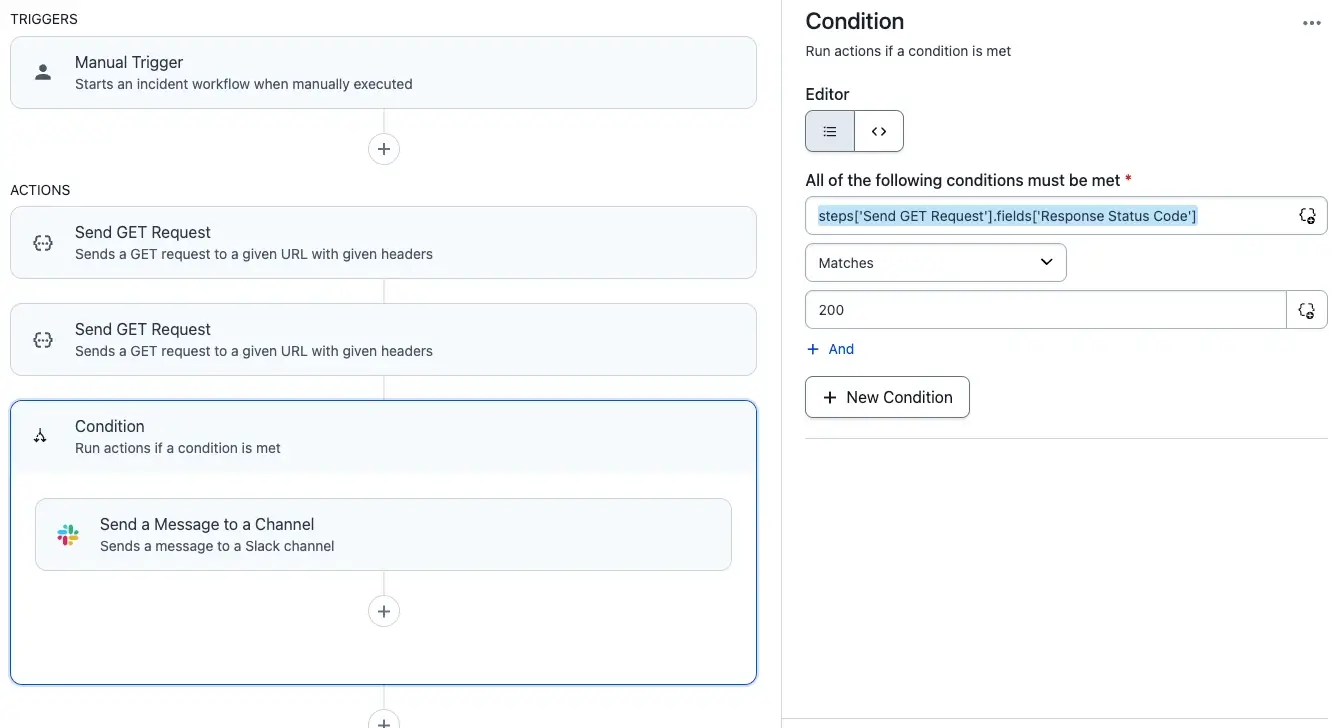 Workflow Condition with Two Actions, Both Named Send GET Request
The action-specific field reference from both actions is steps['Send GET Request'].fields['Response Status Code']. The second Send GET Request action will override the value stored in that reference, so the Condition can only check against the result of the second action.
Example — Actions with Different Names:
By renaming the actions so that each is unique, the output fields from each action will have different identifiers and will not overwrite each other.
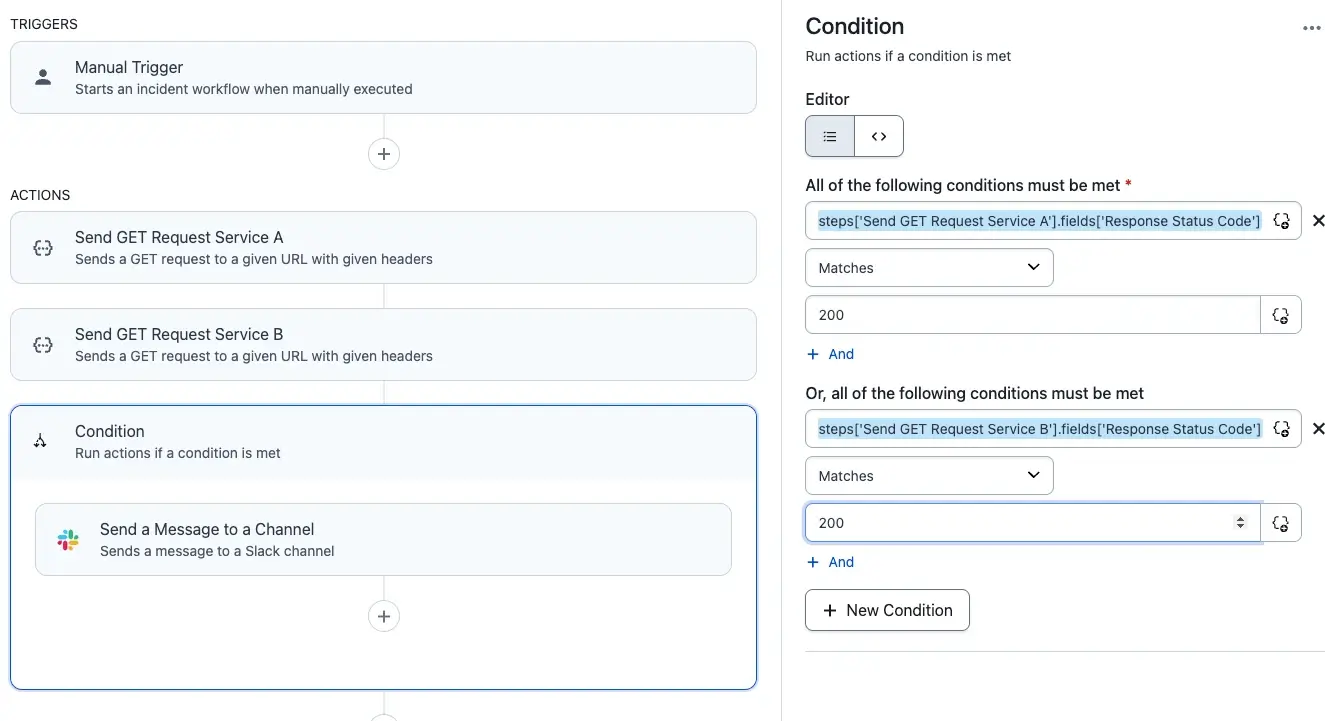 Workflow Condition with Actions Named Send GET Request Service A and Send GET Request Service B
The action-specific field references are now distinct — steps['Send GET Request Service A'].fields['Response Status Code'] and steps['Send GET Request Service B'].fields['Response Status Code'] — so the Condition can check that both GET requests return a 200 status code before sending a Slack message.
Instance vs. Step Scope
- Instance scope refers to fields that are referenceable and exist independently from the configured steps. The
incidentfield is a good example — it is referenceable within the workflow but was not output by any step. - Step scope targets the step name. This gives you control over whether a later step with the same name overrides the prior step's outputs (shared scope), or whether you maintain distinct outputs by giving steps unique names.
Examples
The following examples represent common use cases you might incorporate into your own Incident Workflows.
Run a Workflow
There are three ways to run workflows:
When You Create or Set an Incident Type
Incident Type triggers automatically start an Incident Workflow whenever you create or set an incident of the specified type. The workflow must have an Incident Type trigger configured. This trigger automatically applies to all services on your account.
Required User Permissions
Availability
Manually Run an Incident Workflow
Required User Permissions
- A PD Automation Actions user license is required to manually trigger Incident Workflows that include PagerDuty Automation Actions. Any responder can start all other workflows from an incident.
- If you cannot view a specific workflow, it is because you are not on the Team specified in the workflow's permissions. Contact a Global Admin or Account Owner in your organization to edit the manual workflow permissions.
Manually Run a Workflow via Web or Mobile App
- In the web or mobile app, click the incident's Title to view its details page, then click Run a Workflow in the actions menu.
- In the mobile app, you may also tap More and select Run a Workflow.
- Select your desired Workflow.
- Click Run Workflow.
To configure a manual trigger, follow the instructions in Create an Incident Workflow and select Manual Trigger when you Add Triggers.
Manually Run a Workflow via Slack
See the Slack User Guide for instructions.
Manually Run a Workflow via Microsoft Teams
See the Microsoft Teams Integration Guide for instructions.
Run an Incident Workflow When a Condition Is Met
Incident Workflows with conditional triggers run automatically when their preconfigured conditions are met. The workflow must have a conditional trigger configured.
To configure a conditional trigger, follow the instructions in Create an Incident Workflow and select Conditional Trigger when you Add Triggers.
View Workflow Executions and Step Output
Incident Workflows provide execution history and step-level output so you can see how your workflows actually run, debug failures, and verify that each step produces the expected results.
Availability
Required Permissions
The Workflow Summary Page
The Workflow Summary page shows a list of all executions for a single workflow. It serves as the central place to monitor how your workflow is performing over time.
- Navigate to an Incident Workflow.
- Select the menu beside a workflow.
- Select View Executions.
Filter Executions
Use the following filters to narrow down results:
| Filter | Description |
|---|---|
| Search | Search by execution name or ID. |
| Started by | Filter by who or what triggered the execution (for example, a specific user or "Anyone"). |
| Status | Filter by execution status: Running, Completed, Cancelled, or Paused. |
By default, the page shows executions from the last seven days. Hover over the time-range indicator for more details.
Executions Table
Each row in the table represents a single execution and includes the following columns:
| Column | Description |
|---|---|
| Execution | The execution name, formatted as [Number] - [Workflow Name] - [ID]. Click to view execution details. |
| Triggered by | How the execution was started — for example, Conditional Trigger, Manual, or Incident Type. |
| Start Time | The date and time the execution began. |
| Duration | How long the execution has been running, or its total run time if completed. |
| Status | The current status of the execution. |
Execution Statuses
Executions can have one of four statuses: Completed, Running, Cancelled, or Paused.
View Execution Details
Click any execution in the table to open the Execution Detail page. This page shows exactly what happened during that execution — which steps ran, the outcomes, and the output each step produced.
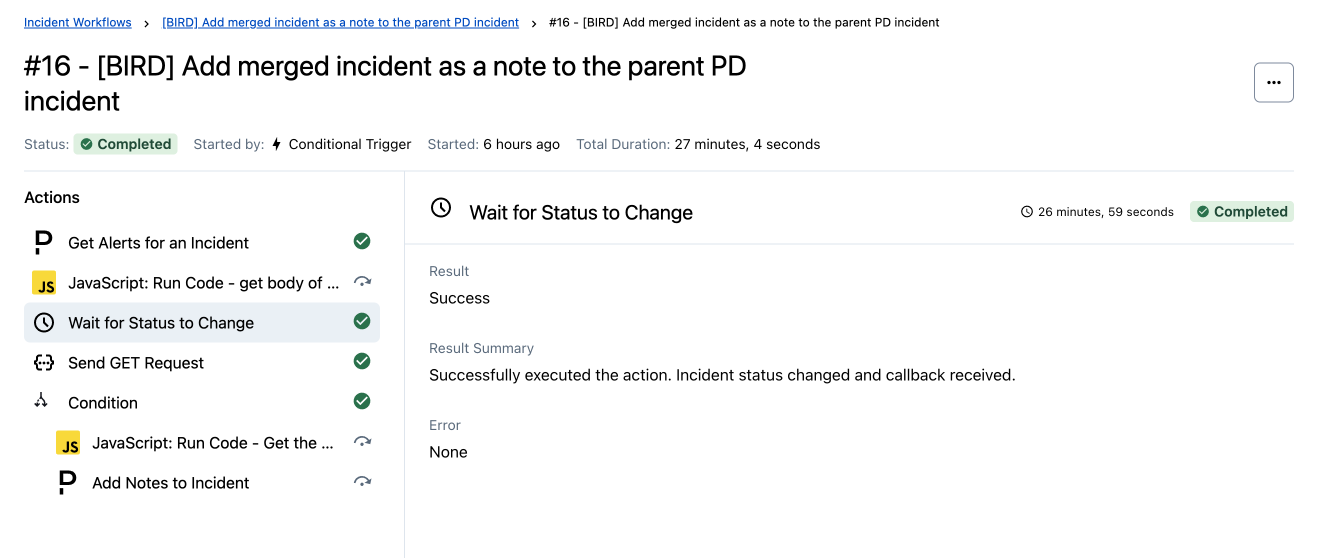 Execution Detail Page
Step List
The left sidebar shows all the actions in the workflow, listed in execution order.
Step Output
When you select a step in the step list, you can view its output. Each output has a Copy value button to copy to your clipboard.
Different action types produce different output fields. For example, a "Wait for Status to Change" step might show the result and result summary, while a "Run Database Check" step might show query results.
Failed Steps
If a step failed, click on it to see the error details in the output panel. The Error field contains information about what went wrong — such as a misconfigured connection, a timeout, or invalid input. Use this information to diagnose and fix the issue in the Workflow Builder.
Cancel an Execution
Cancelling an Execution
Cancelling an execution immediately ends it and skips all remaining steps. This action cannot be undone.
You can only cancel executions that are in a Running or Paused status. Completed and previously cancelled executions cannot be ended.
In the Workflow Summary page, select the menu beside an execution and click End Execution.
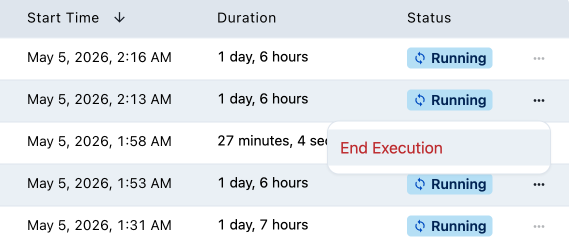 End Execution
Use Cases
Debugging a Failed Workflow
If an Incident Workflow did not produce the expected result during an incident, navigate to its executions, find the relevant execution, and inspect each step. Look for steps with a red warning icon — click on them to see what went wrong, such as a credential error, a timeout, or an unexpected input value.
Verifying a New or Updated Workflow
After creating or modifying a workflow, trigger a test run and use the Execution Detail page to confirm that each step ran correctly and produced the expected output. This is especially useful before relying on the workflow during real incidents.
Auditing Workflow Activity
Use the Workflow Summary page to see how often a workflow runs, what triggers it, and whether executions are completing successfully. This helps you identify workflows that may need attention — for example, workflows with a high failure rate or ones that have not run recently.
View Incident Workflow Audit Trail Reporting
Read Audit Trail Reporting for more information.
Incident Workflow Actions
See the Workflow Actions library for documentation on Incident Workflow actions.